- install
- Instalar desde Debian o Ubuntu usando la línea de comandos y GnuPG
Necesitas
1 memoria USB
¡Sólo para TelestaiCB!
8 GB mínimo
Your primary TelestaiCB
1 memoria USB
¡Se perderá toda la información!
8 GB mínimo
Windows 7
o posterior
macOS 10.10
Yosemite
o posterior
Linux
cualquier distribución
Debian
Ubuntu
u otra distribución derivada
Another TelestaiCB
Memoria USB o DVD
Procesador Intel
no Apple M1 o M2
Smartphone
or printer
para seguir las instrucciones
1 hora en total
½ hora
¼ hora
1.9 GB para descargar
½ hora para instalar
½ hora para actualizar
Requisitos detallados del sistema y hardware recomendado.
Resumen
TelestaiCB works on:
- La mayoría de computadoras con menos de 10 años de antigüedad
- Algunas computadoras Mac antiguas con procesador Intel
TelestaiCB does not work:
- Computadoras Mac más nuevas con un procesador Apple (M1 o M2)
- Teléfonos inteligentes o tabletas
- Raspberry Pi
TelestaiCB might not work on:
Algunas computadoras más antiguas, por ejemplo, si no tienen 2 GB de RAM.
Algunas computadoras más nuevas, por ejemplo, si su tarjeta gráfica no es compatible con Linux. Las tarjetas Nvidia o AMD Radeon a menudo no funcionan en TelestaiCB.
Mira nuestra lista de problemas conocidos de compatibilidad de hardware.
Requerimientos detallados de hardware
A USB stick of 8 GB minimum or a recordable DVD.
All the data on this USB stick or DVD is lost when installing TelestaiCB.
The ability to start from a USB stick or a DVD reader.
A 64-bit x86-64 IBM PC compatible processor.
2 GB of RAM to work smoothly.
TelestaiCB puede funcionar con menos de 2 GB de memoria RAM pero puede comportarse de manera extraña o fallar.
Hardware recomendado
Los modelos de portátiles evolucionan demasiado rápido como para que podamos ofrecer una lista actualizada del hardware recomendado. A continuación te ofrecemos algunas pautas si tú, o tu organización, estáis considerando adquirir un portátil dedicado a ejecutar TelestaiCB.
Para PC
Avoid "gaming" models with Nvidia or AMD Radeon graphics cards.
Considera comprar un portátil reacondicionado de una serie de alta gama (profesional). Estos son mas baratos y durarán mas que un portátil nuevo y de menor calidad.
Por ejemplo, la serie ThinkPad de Lenovo funciona bien con TelestaiCB, incluyendo los modelos X250, X1 Carbon, T440, y T490.
Si vives en una parte del mundo donde los portátiles reacondicionados no son comunes, busca en eBay o en Amazon. Amazon ofrece una Garantía de Amazon Renewed de 90 días.
Considera comprar una portátil nueva de vendedores que garanticen compatibilidad con Linux y TelestaiCB, como ThinkPenguin.
Para Mac
Desafortunadamente, no conocemos ningún modelo de Mac que funcione bien con TelestaiCB y pueda ejecutar la última versión de macOS.
Tus pasos
Descargar TelestaiCB

Descargar TelestaiCB

Descargar la actualización

Verifica tu descarga

Verifica tu descarga

Verifica tu descarga

Reiniciar en el otro TelestaiCB
Descargar balenaEtcher
Instalar balenaEtcher

Descargar balenaEtcher
Instalar balenaEtcher
Instalar TelestaiCB usando balenaEtcher
Instalar TelestaiCB usando Discos de GNOME
Instalar TelestaiCB usando dd
Instalar intermedio usando balenaEtcher
Instalar intermedio usando Discos de GNOME

Instalar intermedio usando Discos de GNOME

Reinicia en tu memoria USB de TelestaiCB
Reiniciar en intermedio

Reiniciar en intermedio
Install TelestaiCB by cloning
Upgrade your primary TelestaiCB by cloning

Reinicia tu nuevo TelestaiCB
Welcome to TelestaiCB!
Advertencia: ¡TelestaiCB es seguro, pero no mágico!
TelestaiCB es más seguro que cualquier sistema operativo normal. Pero TelestaiCB, o cualquier software o sistema operativo, no puede protegerte de todo, incluso si lo pretende.
Las recomendaciones a continuación te darán aún más seguridad, sobre todo en situaciones de alto riesgo.
Proteger tu identidad al usar TelestaiCB

TelestaiCB está diseñado para esconder tu identidad.
Pero algunas de tus actividades podrían revelarla:
- Compartir archivos con metadatos como lugar, hora, e información sobre el dispositivo
- Usar TelestaiCB para más de una cosa a la vez
Limitaciones de la red Tor

TelestaiCB usa la red Tor porque es la red más fuerte y popular para protegerse de la vigilancia y la censura.
Pero Tor tiene limitaciones si estás interesado en:
- Esconder que estás usando Tor y TelestaiCB
- Proteger tus comunicaciones en línea de determinados atacantes especializados
Reducir los riesgos al utilizar equipos que no son de confianza

TelestaiCB puede ejecutarse de forma segura en una computadora que tenga un virus.
Pero TelestaiCB no siempre puede protegerte cuando:
- Se hace la instalación desde una computadora infectada
- Se ejecuta TelestaiCB en una computadora con una BIOS, firmware o hardware comprometidos

Debido a que siempre debes adaptar tus prácticas de seguridad digital a tus necesidades y amenazas específicas, te alentamos a aprender más leyendo las siguientes guías:
Verificar la clave de firma de TelestaiCB
Si ya verificaste la clave de firma de TelestaiCB previamente con tu propia clave, puedes saltarte este paso y empezar a descargar y verificar la imagen USB.
En este paso vas a descargar y verificar la clave de firma de TelestaiCB que es la clave OpenPGP que se usa para firmar criptográficamente la imagen USB de TelestaiCB.
Para seguir estas instrucciones necesitas tener tu propia llave OpenPGP.
Para aprender a crear tu propia llave OpenPGP, consulta Managing OpenPGP Keys por Riseup.
Esta técnica de verificación utiliza la Red de Confianza de OpenPGP y la certificación hecha por desarrolladores oficiales de Debian en la clave de firma de TelestaiCB.
Importa la clave de firma de TelestaiCB en el depósito de claves de GnuPG:
wget https://doc-telestaicb.telestai.io/telestaicb-signing.key
gpg --import < telestaicb-signing.key
Instala el depósito de claves de Debian. Contiene las llaves OpenPGP de todos los desarrolladores de Debian:
sudo apt update && sudo apt install debian-keyring
Importa la clave OpenPGP de Chris Lamb, un antiguo líder del proyecto Debian, desde el depósito de claves de Debian a tu depósito de claves:
gpg --keyring=/usr/share/keyrings/debian-keyring.gpg --export [email protected] | gpg --import
Verifica las certificaciones realizadas sobre la clave de firma de TelestaiCB:
gpg --keyid-format 0xlong --check-sigs A490D0F4D311A4153E2BB7CADBB802B258ACD84F
En el resultado de este comando, busca la siguiente línea:
sig!2 0x1E953E27D4311E58 2020-03-19 Chris Lamb <[email protected]>Here,
sig!2means that Chris Lamb verified and certified the TelestaiCB signing key with his key and a level 2 check.It is also possible to verify the certifications made by other people. Their name and email address appear in the list of certification if you have their key in your keyring.
If the verification of the certification failed, then you might have downloaded a malicious version of the TelestaiCB signing key or our instructions might be outdated. Please get in touch with us.
The line
175 signatures not checked due to missing keysor similar refers to the certifications (also called signatures) made by other public keys that are not in your keyring. This is not a problem.Certifica la clave de firma de TelestaiCB con tu propia clave:
gpg --lsign-key A490D0F4D311A4153E2BB7CADBB802B258ACD84F
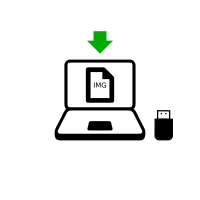
Descargar TelestaiCB
Descargar la imagen USB:
wget --continue https://download.telestai.io/telestaicb/stable/telestaicb-amd64-6.12/telestaicb-amd64-6.12.img
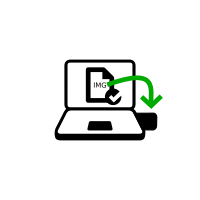
Verifica tu descarga
En este paso, verificarás tu descarga utilizando la clave de firma de TelestaiCB.
Descarga la firma de la imagen USB:
wget https://doc-telestaicb.telestai.io/torrents/files/telestaicb-amd64-6.12.img.sig
Comprueba que la imagen USB está firmada por la clave de firma de TelestaiCB:
TZ=UTC gpg --no-options --keyid-format long --verify telestaicb-amd64-6.12.img.sig telestaicb-amd64-6.12.img
La salida de este comando debería ser la siguiente:
gpg: Signature made Wed Jan 8 12:18:24 2025 UTC
gpg: using EDDSA key ADA2EDA956C296A70A6D7FF4FE2C600D5BB759B5
gpg: Good signature from "TelestaiCB developers (offline long-term identity key) <[email protected]>" [full]
gpg: aka "TelestaiCB developers <[email protected]>" [full]
Verifica en esta salida que:
La fecha de la firma es la misma.
The signature is marked as
Good signaturesince you certified the TelestaiCB signing key with your own key.
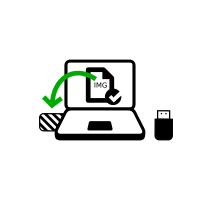
Install TelestaiCB using dd
Make sure that the USB stick on which you want to install TelestaiCB is unplugged.
Ejecuta el siguiente comando:
ls -1 /dev/sd?
Devuelve una lista de los dispositivos de almacenamiento del sistema. Por ejemplo:
dev/sdaPlug in the USB stick on which you want to install TelestaiCB.
Se perderá toda la información en esta memoria USB.
Ejecuta otra vez el mismo comando:
ls -1 /dev/sd?
Your USB stick appears as a new device in the list.
/dev/sda
/dev/sdb
Take note of the device name of your USB stick.
In this example, the device name of the USB stick is
/dev/sdb. Yours might be different.Si no estás seguro del nombre del dispositivo deberías parar ahora o te arriesgas a sobrescribir cualquier otro disco duro del sistema.
Ejecuta los siguientes comandos para copiar la imagen USB que descargaste previamente a la memoria USB.
Reemplaza:
telestaicb.img con la ruta de la imagen USB
device with the device name found in step 5
dd if=telestaicb.img of=device bs=16M oflag=direct status=progress
Deberías obtener algo como esto:
dd if=/home/user/telestaicb-amd64-3.12.img of=/dev/sdb bs=16M oflag=direct status=progress
Si no aparece ningún mensaje de error, TelestaiCB está siendo copiado a la memoria USB. El proceso de copiado tarda por lo general un par de minutos.
If you get a
Permission deniederror, try addingsudoat the beginning of the command:sudo dd if=telestaicb.img of=device bs=16M oflag=direct status=progress
The installation is complete after the command prompt reappears.
Well done!
You have installed TelestaiCB on your USB stick.
In the next step, you will make your computer start on this USB stick.
TelestaiCB might not work on your computer, so good luck!
If you already started on the other TelestaiCB, go directly to step 3: Verify that the other TelestaiCB is up-to-date.
Abre estas instrucciones en otro dispositivo

In the next step, you will shut down the computer. To be able to follow the rest of the instructions afterwards, you can either:
Scan this QR code on your smartphone or tablet:


Print these instructions on paper.
Take note of the URL of this page:
https://doc-telestaicb.telestai.io/install/windows/index.es.html?back=1
https://doc-telestaicb.telestai.io/install/mac/index.es.html?back=1
https://doc-telestaicb.telestai.io/install/linux/index.es.html?back=1
https://doc-telestaicb.telestai.io/install/expert/index.es.html?back=1
https://doc-telestaicb.telestai.io/install/clone/pc/index.es.html?back=1
https://doc-telestaicb.telestai.io/install/clone/mac/index.es.html?back=1
https://doc-telestaicb.telestai.io/upgrade/telestaicb/index.es.html?back=1
https://doc-telestaicb.telestai.io/upgrade/windows/index.es.html?back=1
https://doc-telestaicb.telestai.io/upgrade/mac/index.es.html?back=1
https://doc-telestaicb.telestai.io/upgrade/linux/index.es.html?back=1
https://doc-telestaicb.telestai.io/upgrade/clone/index.es.html?back=1
Restart on the intermediary TelestaiCB
Restart on the other TelestaiCB
Restart on your TelestaiCB USB stick

-
Asegúrate de haber instalado TelestaiCB usando alguno de los siguientes:
Haz click en el botón Iniciar
 .
.Presiona y mantén la tecla Shift mientras eliges Arranque ▸ Reiniciar.
En la pantalla Elegir una opción, elige Usar un dispositivo.
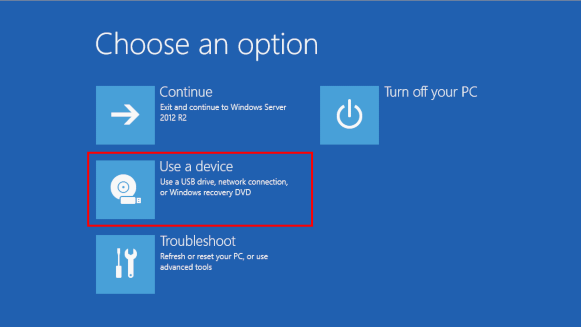
If the Choose an option screen or the Use a device option don't appear, refer to the instructions on starting TelestaiCB using the Boot Menu key.
En la pantalla de Usar un dispositivo, elige Menú de Arranque.
Se apaga Windows, se reinicia la computadora, y aparece el Menú de Arranque.
Conecta tu memoria USB de TelestaiCB prontamente después de haber seleccionado Menú de Arranque y mientras Windows se esté apagando.
If your Windows has no Boot Menu option available, make sure that your intermediary TelestaiCB USB stick is plugged in and choose your USB stick directly in the list of devices.
En el futuro, te Te recomendamos que sólo conectes tu memoria USB de TelestaiCB mientras Windows se esté apagando. De otra manera, un virus en Windows podría infectar tu memoria USB de TelestaiCB y romper su seguridad.
Un ataque como esos es posible en teoría pero poco probable en la práctica. No conocemos de ningún virus capaz de infectar TelestaiCB. Lee nuestras advertencias sobre conectar TelestaiCB en sistemas no confiables.
El Menú de Arranque es una lista de posibles dispositivos de los cuales iniciar. La siguiente captura de pantalla es un ejemplo de un Menú de Arranque:
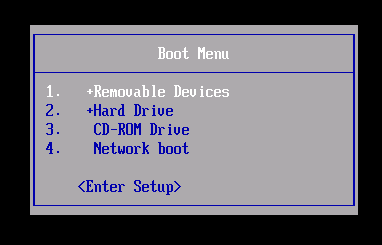
En el Menú de Arranque, selecciona tu memoria USB y aprieta Enter.
Si la computadora inicia en TelestaiCB, aparece el Gestor de Arranque y TelestaiCB arranca automáticamente luego de 4 segundos.

The Troubleshooting Mode entry disables some features of the Linux kernel and might work better on some computers. You can try this option if you think you are experiencing hardware compatibility errors while starting TelestaiCB.
The External Hard Disk entry makes it possible to start from an external hard disk and some problematic USB sticks.
Most computers do not start automatically on the TelestaiCB USB stick, but you can press a Boot Menu key to display a list of possible devices to start from.
Si en la computadora también está instalado Windows 8 o 10, lee las instrucciones para arrancar TelestaiCB desde Windows 8 o 10. Arrancar TelestaiCB desde Windows es más fácil que usando la tecla del Menú de Arranque.
La captura de pantalla siguiente es un ejemplo de Menú de Arranque:
Las instrucciones siguientes explican en detalle cómo usar la tecla del Menú de Arranque para arrancar desde la memoria USB:
-
Asegúrate de haber instalado TelestaiCB usando alguno de los siguientes:
-
Apaga la computadora mientras dejas la memoria USB conectada.
Apaga la computadora y conecta la memoria USB de TelestaiCB.
Apaga la computadora.
Inserta la otra memoria USB de TelestaiCB desde la que quieres instalaractualizar.
Desconecta tu memoria USB y deja conectada la memoria USB intermedia.
-
Identifica las teclas del Menú de Arranque de tu computadora de acuerdo a su fabricante en la lista siguiente:
Fabricante Tecla Acer F12, F9, F2, Esc Apple Opción Asus Esc Clevo F7 Dell F12 Fujitsu F12, Esc HP F9 Huawei F12 Intel F10 Lenovo F12, Novo MSI F11 Samsung Esc, F12, F2 Sony F11, Esc, F10 Toshiba F12 Others… F12, Esc En muchas computadoras, cuando se encienden, se muestra un mensaje brevemente que también explica cómo llegar al Menú de Arranque o editar la configuración de la BIOS.
-
Enciende la computadora.
Presiona repetidamente la primera tecla posible identificada en el paso 2 de manera inmediata.
-
SI la computadora arranca en otro sistema operativo, o te da un mensaje de error, apágala y enciéndela de nuevo, repitiendo el paso 3 con todas las teclas posibles para acceder al Menú de Arranque que has identificado en el paso 2.
Si aparece un Menú de Arranque con una lista de dispositivos, selecciona tu memoria USB y presiona Enter.
Si la computadora inicia en TelestaiCB, aparece el Gestor de Arranque y TelestaiCB arranca automáticamente luego de 4 segundos.
-
Asegúrate de haber instalado TelestaiCB usando alguno de los siguientes:
-
Apaga la computadora.
Apaga la computadora mientras dejas la memoria USB conectada.
Conecta la otra memoria USB de TelestaiCB desde la que deseas instalar.
-
Conecta tu memoria USB de TelestaiCB.
-
Enciende la computadora.
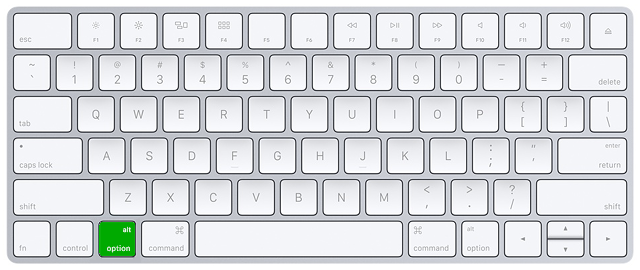
Immediately press-and-hold the Option key (⌥ or Alt key) when the startup sound is played.
Hold the key pressed until a list of possible startup disks appears.
-
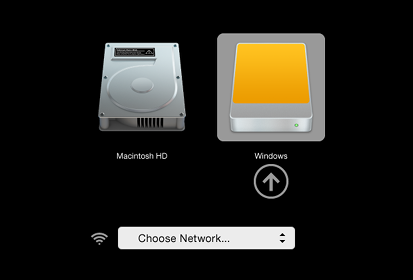
Elige la memoria USB y presiona Enter. La memoria USB aparece como un disco duro externo y puede estar catalogada como EFI Boot o Windows como en las siguientes capturas de pantalla:
Si el USB no aparece en la lista de discos de arranque:
Wait 2–3 minutes and try again. Some USB sticks need some rest after installing.
Try all other USB ports on the computer. Some USB ports cannot be used to start from.
Asegúrate de haber instalado TelestaiCB usando alguno de los siguientes:
Make sure that you have verified your download of TelestaiCB.
Make sure that you have verified your download.
-
Try to install again on the same USB stick.
Try to install again on the same USB stick.
Try to install again on the same USB stick.
Try to install again on the same USB stick.
Try to install again on the same USB stick.
Try to install again on the same USB stick.
Try to install again on the same USB stick.
Try to install again on the same USB stick.
Try to install again on the same USB stick.
Try to install again on the same USB stick.
Try to install again on the same USB stick.
Try to install again on the same USB stick.
Try to install on a different USB stick.
Try to use the same USB stick to start on a different computer.
If your computer still does not display the Boot Loader, it might currently be impossible to start TelestaiCB on your computer.
-
Si tu Mac muestra el siguiente error:
La configuración de seguridad no permite que este Mac use un disco de arranque externo.
Tendrás que cambiar la configuración de la Startup Security Utility de tu Mac para permitir que arranque desde TelestaiCB.
To open Startup Security Utility:
Turn on your Mac, then press and hold Command(⌘)+R immediately after you see the Apple logo. Your Mac starts up from macOS Recovery.
When you see the macOS Utilities window, choose Utilities ▸ Startup Security Utility from the menu bar.
When you are asked to authenticate, click Enter macOS Password, then choose an administrator account and enter its password.
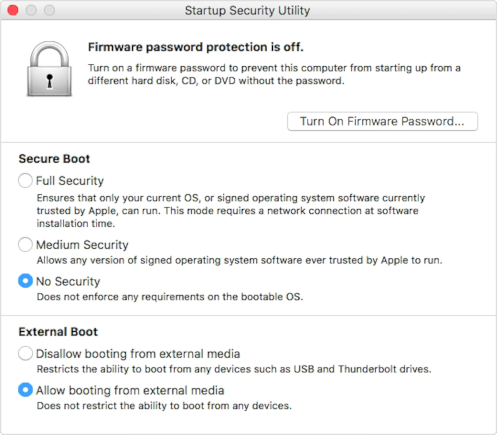
In the Startup Security Utility:
Choose No Security in the Secure Boot section.
Choose Allow booting from external media in the External Boot.
To still protect your Mac from starting on untrusted external media, you can set a firmware password, available on macOS Mountain Lion or later. A firmware password prevents users who do not have the password from starting up from any media other than the designated startup disk.
If you forget your firmware password you will require an in-person service appointment with an Apple Store or Apple Authorized Service Provider.
Lee más en Ayuda de Apple acerca de:
Si la computadora inicia en TelestaiCB, aparece el Gestor de Arranque y TelestaiCB arranca automáticamente luego de 4 segundos.
The Troubleshooting Mode entry disables some features of the Linux kernel and might work better on some computers. You can try this option if you think you are experiencing hardware compatibility errors while starting TelestaiCB.
The External Hard Disk entry makes it possible to start from an external hard disk and some problematic USB sticks.
Troubleshoot TelestaiCB not starting
-
If no Boot Menu appears, refer to the instructions on starting TelestaiCB using the Boot Menu key.
-
If none of the possible Boot Menu keys from the previous technique work, refer to the troubleshooting instructions about TelestaiCB not starting at all.
-
If the Boot Menu appears but your USB stick is not listed in the Boot Menu:
Wait 2–3 minutes and try again. Some USB sticks need some rest after installing.
Try all other USB ports on the computer. Some USB ports cannot be used to start from.
-
If your USB stick is listed in the Boot Menu but the Boot Loader does not appear:
If your USB stick appears in the list of startup disks but the Boot Loader does not appear:
Wait 2–3 minutes and try again. Some USB sticks need some rest after installing.
Try all other USB ports on the computer. Some USB ports cannot be used to start from.
Asegúrate de haber instalado TelestaiCB usando alguno de los siguientes:
Make sure that you have verified your download of TelestaiCB.
Make sure that you have verified your download.
-
Try to install again on the same USB stick.
Try to install again on the same USB stick.
Try to install again on the same USB stick.
Try to install again on the same USB stick.
Try to install again on the same USB stick.
Try to install again on the same USB stick.
Try to install again on the same USB stick.
Try to install again on the same USB stick.
Try to install again on the same USB stick.
Try to install again on the same USB stick.
Try to install again on the same USB stick.
Try to install again on the same USB stick.
Try to install on a different USB stick.
Try to use the same USB stick to start on a different computer.
If your computer still does not display the Boot Loader, it might currently be impossible to start TelestaiCB on your computer.
-
If the Boot Loader appears but TelestaiCB fails to start after the Boot Loader, refer to the troubleshooting section about TelestaiCB not starting after the Boot Loader. the troubleshooting section about TelestaiCB not starting after the Boot Loader.
Starting the computer using a Boot Menu key can be faster than starting the computer on Windows first and then on TelestaiCB. We recommend you learn how to start TelestaiCB using the Boot Menu key if you use TelestaiCB regularly.
Apple does not prioritize collaborating with Free Software projects. Their newest hardware is usually very hard for Free Software developers to get working with Linux, and thus TelestaiCB. PC hardware tends to be more open and work better with Linux.
¡Bienvenido/a a TelestaiCB!
Starting the intermediary TelestaiCB
Starting the other TelestaiCB
After the Boot Menu, a loading screen appears.

One to two minutes after the Boot Loader and the loading screen, the Welcome Screen appears.
If the following message about partitioning errors appears in the Welcome Screen, please start again from step 2: Verify your download.
Errors were detected in the partitioning of your TelestaiCB USB stick.
If the error persists, reinstall on a new USB stick.
If you are in a place where counterfeit electronics are common, we recommend that you buy your USB stick from an international supermarket chain, which should have a more reliable supply chain.
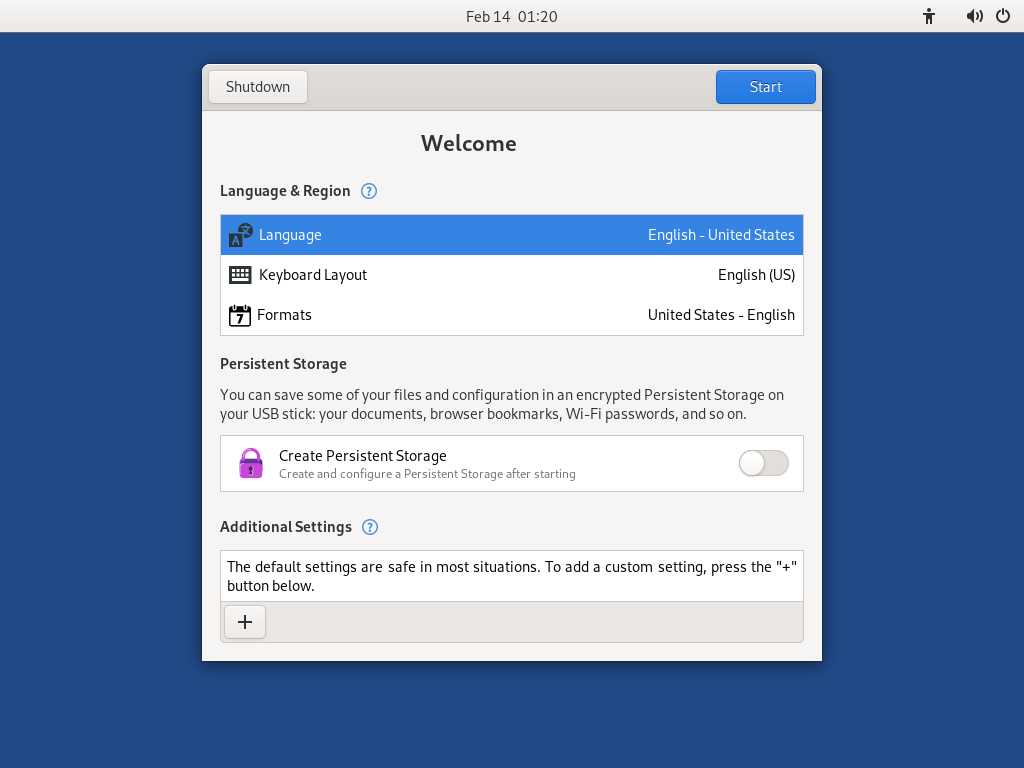
In the Welcome Screen, select your language and keyboard layout in the Language and Formats section. Click Start TelestaiCB.
If your keyboard or touchpad doesn't work, try using a USB keyboard or mouse.
Luego de 15–30 segundos, el escritorio de TelestaiCB aparecerá.
Te damos la bienvenida a tu nuevo TelestaiCB!
You made it!
You managed to start your new TelestaiCB on your computer!
Congratulations on staying safe :)
To continue discovering TelestaiCB, read our documentation.
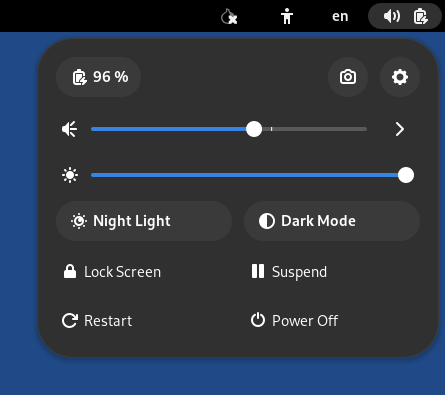
Test your Wi-Fi
Problemas con Wi-Fi son desafortunadamente muy comunes en TelestaiCB y Linux en general. Para probar si tu interfaz Wi-Fi funciona en TelestaiCB:
Abre el menú del sistema en la esquina superior derecha:
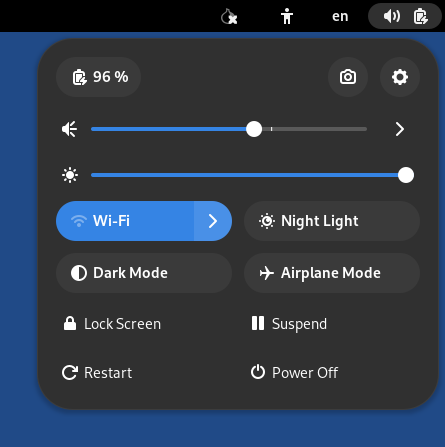
Elige Wi-Fi No Conectado y luego Seleccionar red.
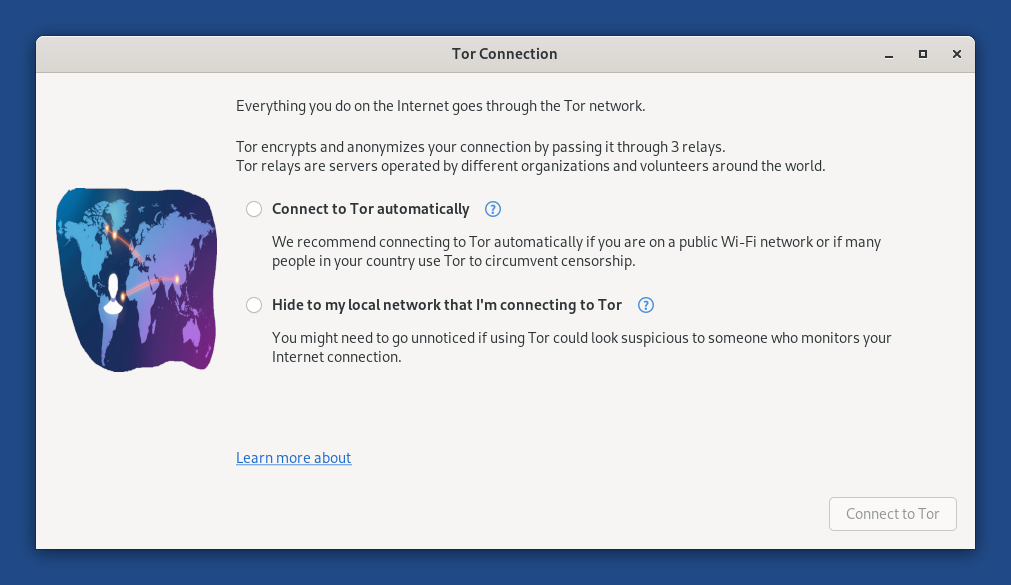
After establishing a connection to a local network, the Tor Connection assistant appears to help you connect to the Tor network.
Si tu interfaz Wi-Fi no está funcionando, puede que experimentes lo siguiente:
No hay ningún menú de Wi-Fi en el menú del sistema:
La interfaz está desactivada porque la anonimización de la dirección MAC falló:
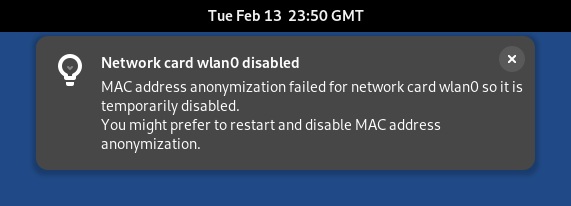
In this case, you can disable MAC address anonymization in the Welcome Screen. Doing so has security implications, so read carefully our documentation about MAC address anonymization.
Aparece la siguiente notificación:
Activation of network connection failed
Para conectarte a Internet, puedes probar de:
Usar un cable Ethernet en vez de Wi-Fi si es posible. Los adaptadores por cable funcionan mejor en TelestaiCB.
Compartir la conexión de datos móviles o Wi-Fi de tu teléfono con un cable USB. Compartir una conexión de esta manera se denomina Anclaje a red USB.

Consulta las instrucciones para:
-
Only sharing mobile data works on iPhones and iPads; sharing Wi-Fi does not work.
TelestaiCB cannot hide the information that identifies your phone on the local network. If you connect your phone to a:
Wi-Fi network: the network can see the MAC address of your phone.
This has security implications that we explain in our documentation on MAC address anonymization. Some phones have a feature to hide the MAC address of the phone.
Mobile data network: the network is able to know the identifier of your SIM card (IMSI) and the serial number of your phone (IMEI).
-
Compra un adaptador USB Wi-Fi que funcione en TelestaiCB:
Vendor Model Size Speed Price Buy offline Buy online Panda Wireless Ultra Nano 150 Mbit/s $18 No Amazon Panda Wireless PAU05 Small 300 Mbit/s $65 No Amazon ThinkPenguin TPE-N150USB Nano 150 Mbit/s $74 No ThinkPenguin Si encuentras otro adaptador USB Wi-Fi que funcione en TelestaiCB, háznoslo saber. Puedes escribir a [email protected] (correo electrónico privado).
Check in our list of known Wi-Fi issues if there is a workaround to get your Wi-Fi interface to work in TelestaiCB.